A lot of people claim that with JavaScript one can build everything. There’s a seemingly endless amount of great frameworks for web development, we can do backend development with node and there are tools like React Native for targeting mobile. It’s even possible to build desktop applications using Electron.
But is it also possible to do desktop automation with JavaScript? It sure is!
Using node add-ons it’s possible to use OS APIs, so we’re able to simulate inputs or retrieve screen content.
However, building and shipping a “ready-to-use” desktop automation framework for three major platforms requires an elaborate development setup, so today I want to show you how I organise my work on nut.js, talking about
Repo setup
When talking about tooling, one should also address repository setups. While it is possible to do all development on a single branch, I’m a huge fan of GitFlow. I’m full-time employed in software development, so depending on my workload, I spend more or less time on personal projects. Whenever I have some energy left in the evening or when I find time for coding on a weekend, I will pick up some old task, or start a new one if I feel like it. Following the GitFlow, all development happens on feature branches. So no matter what I’m currently working on, I’m always able to seamlessly switch to another task. Develop and master branches only change when
- a feature has been finished
- a new stable version has been released
For possible contributors this is a huge benefit since they will always be able to check out either master or develop to get going. Cloning a project to realise that it’s in an inconsistent state and won’t build is rather frustrating.
TypeScript
This part may be a little opinionated, but TypeScript turned into my default when starting new projects. Its type system is really helpful, yet it’s unintrusive. A great combination for everyday use.
While not necessarily required, I tend to adjust the default tsconfig.json a bit:
{
  "compilerOptions": {
    "outDir": "./dist",
    "declaration": true,
    "declarationMap": true,
    "sourceMap": true,
    "strict": true,
    "noImplicitAny": true,
    "noUnusedLocals": true,
    "noUnusedParameters": true,
    "noImplicitReturns": true,
    …
  },
  “include”: [
    “lib/**/*.ts”,
    “index.ts”
  ],
  “exclude”: [
    “node_modules”
  ]
}
The TypeScript config is accompanied by the following scripts:
…
“scripts”: {
  “clean”: “rm -rf dist”,
  “compile”: “npm run clean && tsc -p .”,
  “prepublishOnly”: “npm run compile”,
  …
},
…
A setup which fits my needs perfectly. Simple, yet powerful! 💪
Documentation
When developing a framework you might be tempted to solely focus on features, but if you want people to use your work, you’ll have to provide documentation and samples. Fortunate enough, there are multiple solutions available which allow you to host your samples and / or documentation.
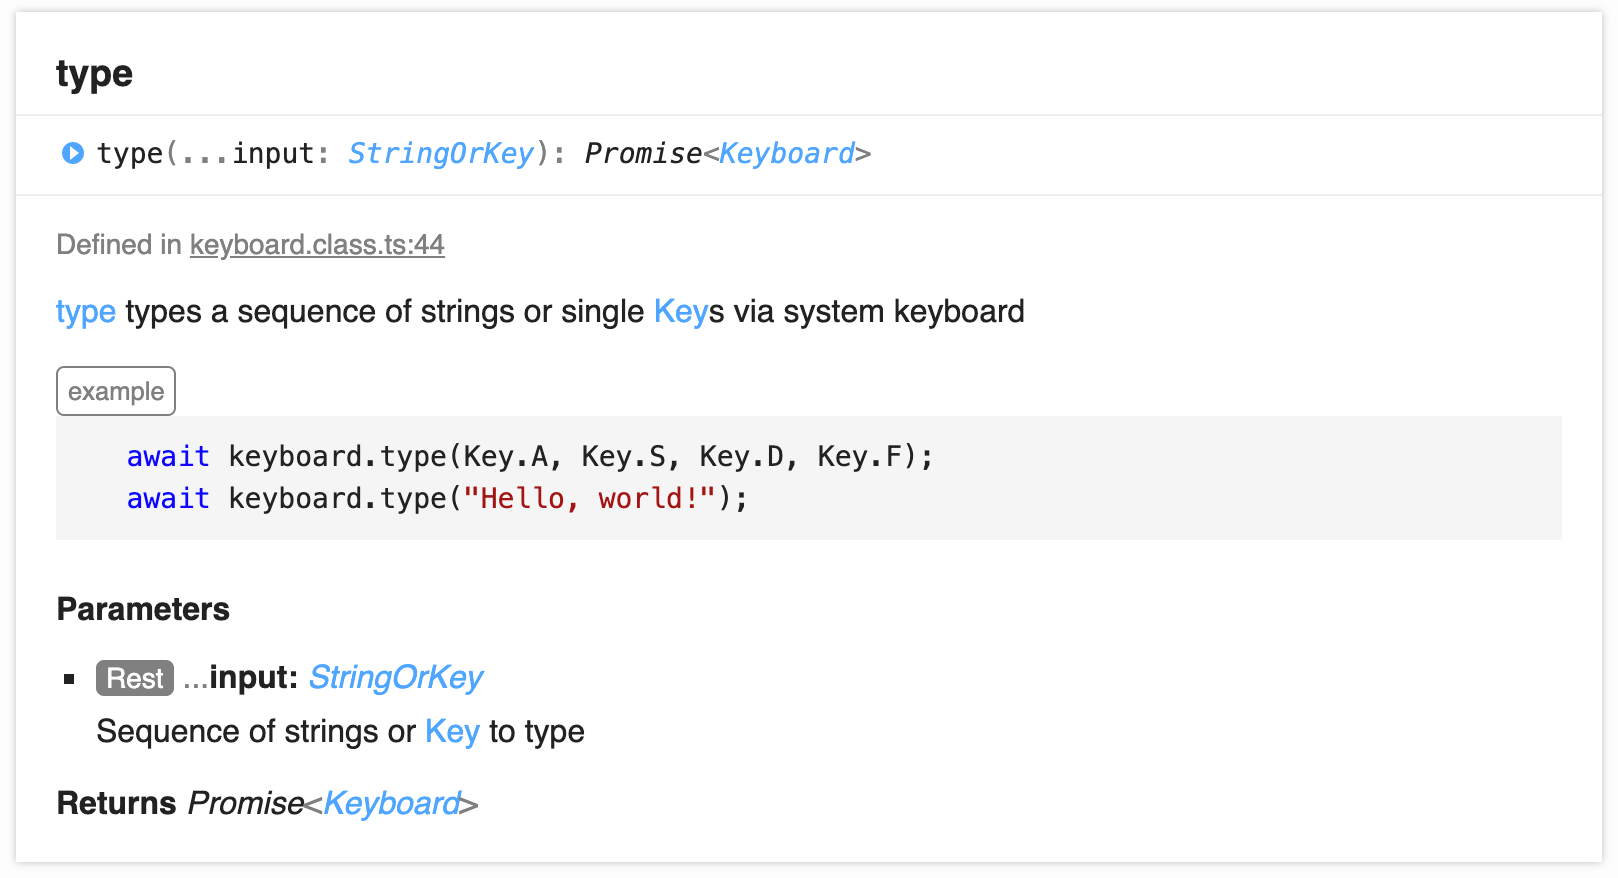
nut.js uses typedoc to automatically generate API documentation including short examples from doc comments:
/**
 * {@link type} types a sequence of strings or single {@link Key}s via system keyboard
 * @example
 * ```typescript
 *    await keyboard.type(Key.A, Key.S, Key.D, Key.F);
 *    await keyboard.type("Hello, world!");
 *  @param input Sequence of strings or {@link Key}s to type
 */
Typedoc is configured to output generated documentation to a *docs* folder in our repository.
"scripts": {
  ...
  "typedoc": "typedoc --options ./typedoc.js --out ./docs lib/"
},
GitHub pages is able to use this docs folder on master branch as source and with just a few clicks documentation is live at https://nut-tree.github.io/nut.js/.
For samples, I’m using a separate repository at nut-tree/trailmix.
It’s a lerna monorepo which contains packages for every (current) main aspect of nut.js. Following the monorepo approach makes updating and testing against a new release of nut.js easy since dependencies are managed at root level. A great benefit which helps keeping samples up-to-date. And since all samples are designed to be Jest tests, it also allows to detect errors early on.
Testing
Testing is THE most crucial part for nut.js development.
We have to make sure nut.js builds and runs on multiple platforms. The only feasible way to do this is relying heavily on automation. And the only way to reliably automate processes is to have a proper test setup which allows us to verify our system’s behaviour.
The testing framework I’m most comfortable with is Jest · 🃏 . It has all the features I’m looking for in a testing framework and plays along nicely with TypeScript using the ts-jest preset.
module.exports = {
  collectCoverageFrom: [
    "index.ts",
    "lib/**/*.ts",
    "!lib/**/*.spec.ts",
    "!<rootDir>/node_modules/",
  ],
  preset: "ts-jest",
  testEnvironment: "node",
  testMatch: process.env.E2E_TEST ?
    ["**/__tests__/?(e2e)/**/*.[jt]s?(x)", "**/?(*.)?(e2e.)+(spec|test).[jt]s?(x)"] :
    ["**/__tests__/!(e2e)/**/*.[jt]s?(x)", "**/!(*.e2e.*)+(spec|test).[jt]s?(x)"],
  testPathIgnorePatterns: [
    "/node_modules/",
    "/dist/",
  ],
};
This single config file enables TypeScript support for Jest, allows me to collect coverage for files I’m interested in and separates two kinds of tests.
nut.js includes unit tests which can be run every time, but also features E2E tests which are meant to be run in a Docker container featuring a certain UI.
E2E tests will only be included in a test run in case the E2E_TEST environment variable is set.
Tests are simply distinguished by their file name: feature.class.spec.ts would contain unit tests for a feature, while feature.class.e2e.spec.ts contains a full E2E test which depends on a fixed UI.
On CI, all tests are executed in a Docker container to run all available tests.
Continuous Integration / Continuous Deployment
nut.js currently uses two CI systems:
It’s a total of 16 CI jobs which run tests against five supported node version (10, 11, 12, 13, 14) on three supported platforms (Windows, macOS, Linux).
The 16th job publishes snapshot and stable releases.
On Travis, nut.js imposes a three stage setup. The first stage builds and tests against the current node LTS release. Once tests were successful, sonarcloud is used for static code analysis.
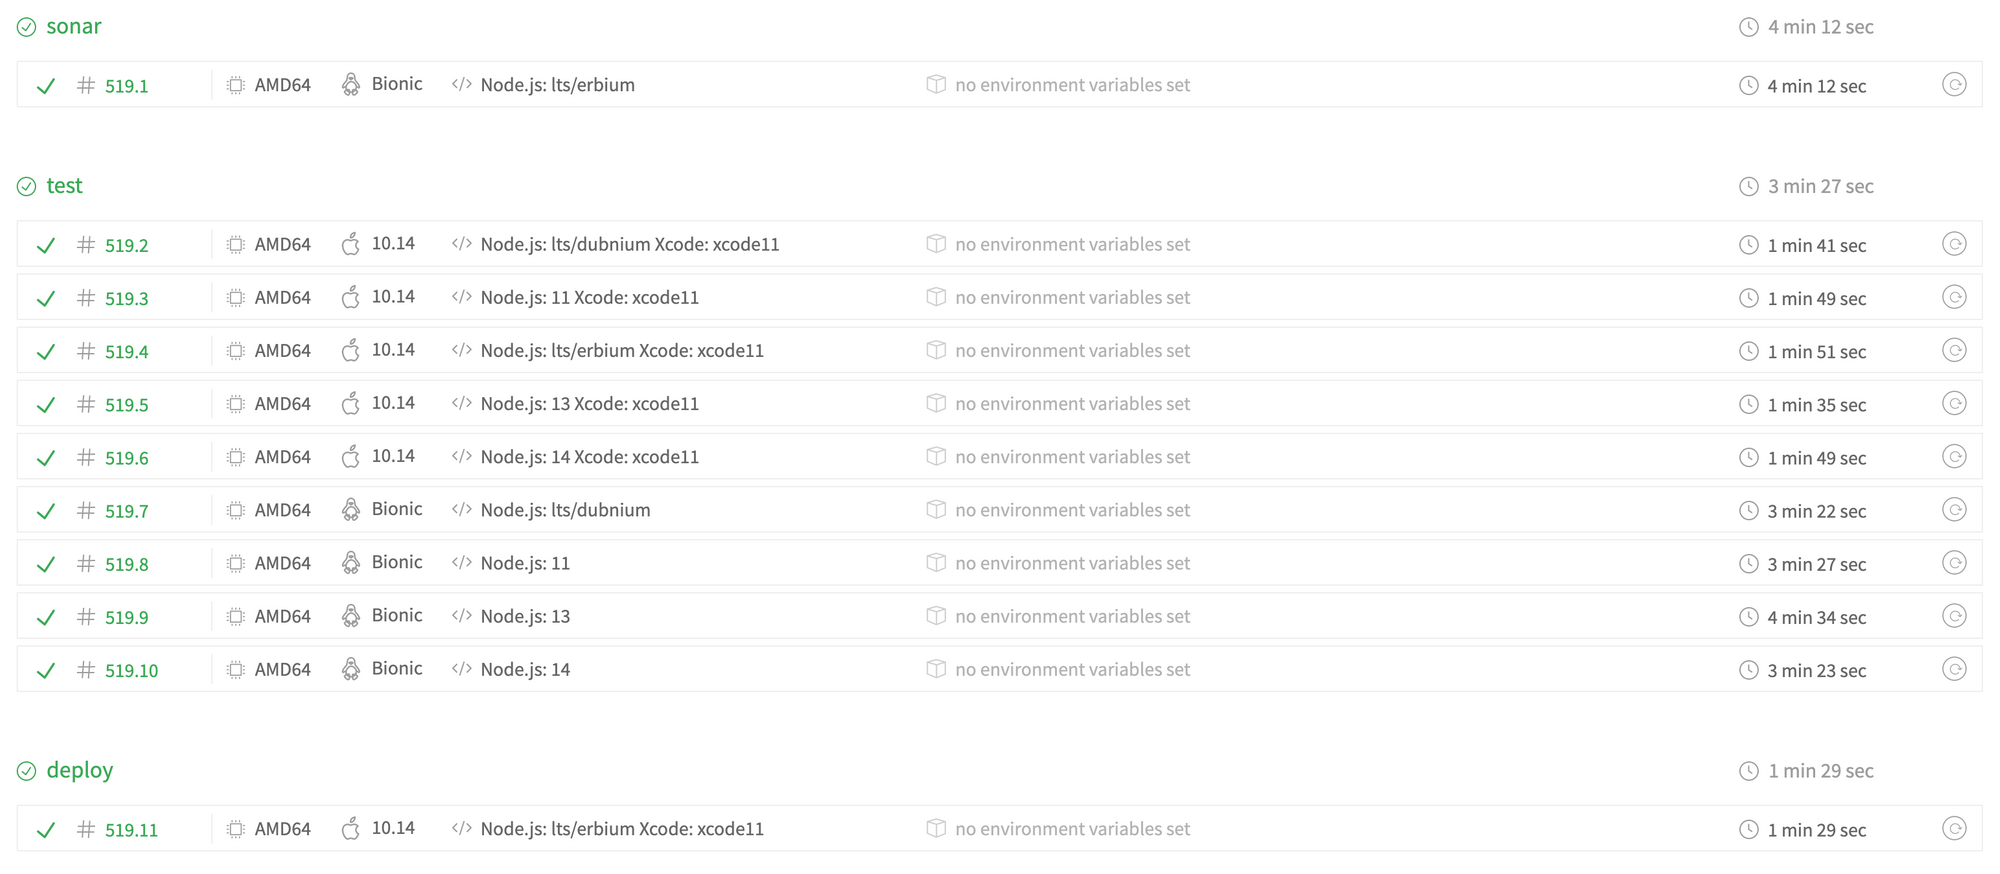
The following stage is used to test against remaining combinations of platform and node version.
A final deploy stage will be run in case of a tagged commit or a build on develop branch. In case we pushed a new tag, a stable release will be published under the default @latest tag. Builds for the develop branch will do a snapshot release under the @next tag. So whenever a feature is finished and gets merged to develop, a new snapshot release will be published. Snapshots are great for fast feedback, since users do not have to wait for the next stable release to test new features.
Branch Protection
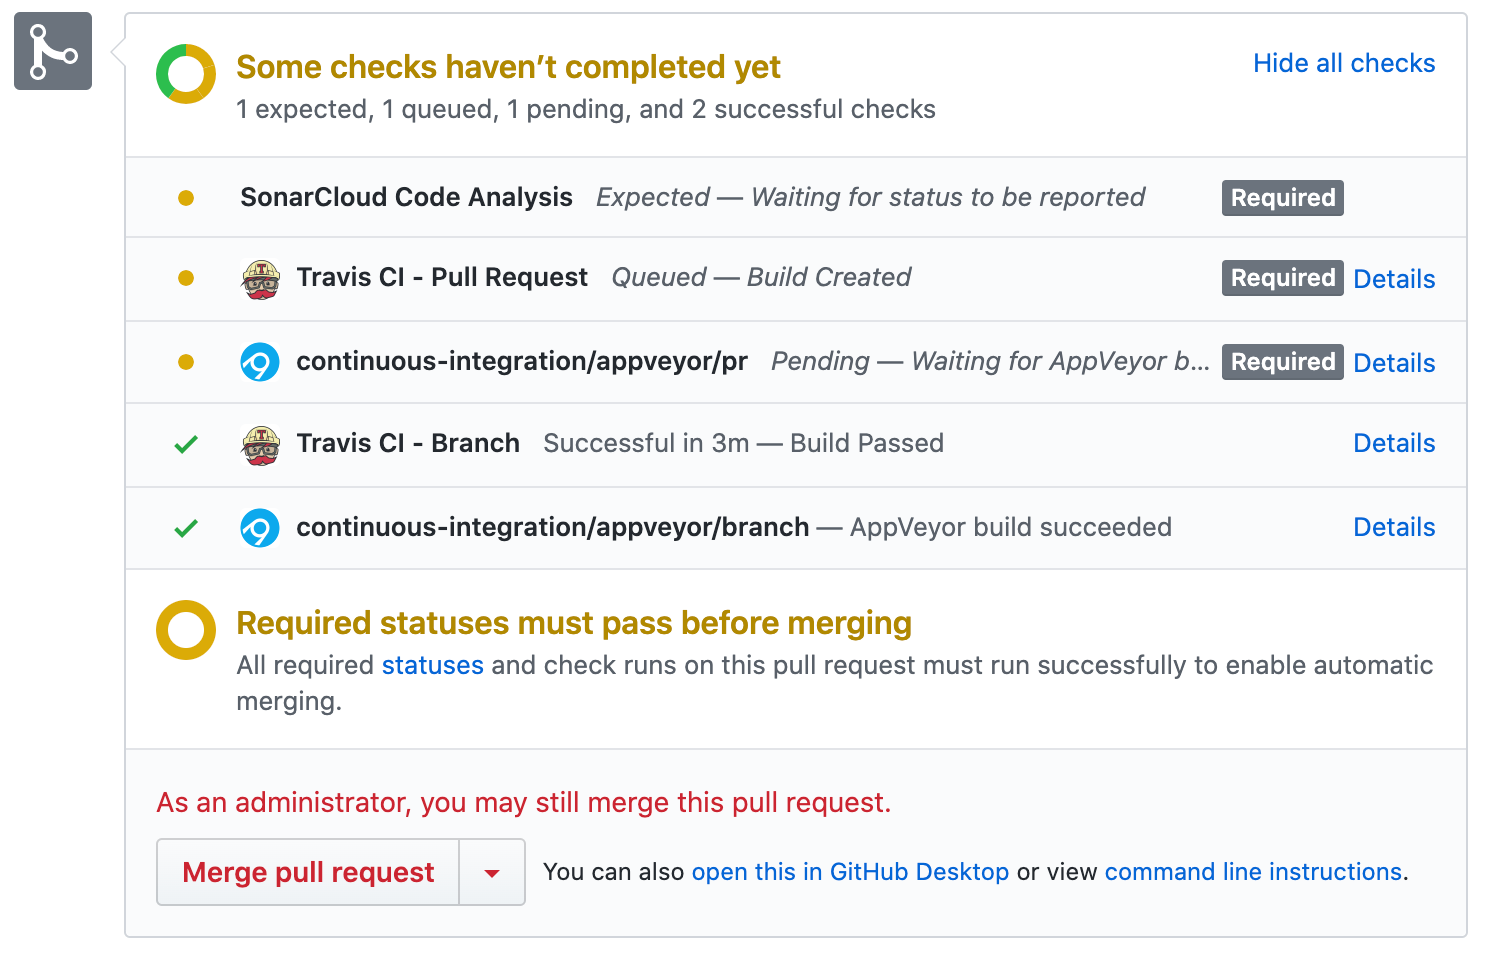
A nice benefit of having a proper test and CI setup is branch protection. We want to keep our code clean and we also don’t want any surprises after merging a pull request.
With branch protection enabled we can enforce certain status checks to pass before merging a PR.
Sonarcloud and Travis / Appveyor are amongst available status checks, so if the pull request build fails or our quality gate is missed, a PR won’t be mergeable (unless forced by a repo owner or admin).
You might now be thinking that these settings are more relevant when collaborating with others, but solo developers can benefit from these features, too!
Conclusion
The setup I just walked you through evolved over time and allows me to maintain nut.js with confidence.
Refactorings are covered by tests, releases are automated, documentation is version controlled and automated - a setup to my likings.
So, how does your setup look like? I’m happy to hear from you!